素敵な3つのWebサイトの使用技術を分析&実践してみた
Webデザインの勉強を始めたという方によく質問されるのが、「どうやって勉強すればいいですか?」。私はWeb制作の学校の学生だった頃から実践しているふたつの事があります。素敵だなって思えるWebサイトを見つけたら、どのように作られているのか自分なりに分析してみること。そしてそこで使われている技を実際に試してみること。そこで今日は最近見かけた素敵Webサイトと、そのサイトで使われていた技術を解説してみたいと思います!
![]()
↑私が10年以上利用している会計ソフト!
準備:分析&実践に役立つツール
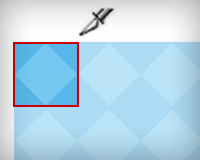
Chrome、Safariなら付属のデベロッパーツール

ChromeとSafariならブラウザーにはじめからデベロッパーツールなる開発のためのツールがついています。私が愛用しているのはこのツール。表示しているWebページのHTMLやCSSが確認、編集することができる優れもの!このツールで気になる部分がどう作られているのかを見ることができます。詳しい使い方は「Google Chrome Deveoper Toolsはこう使う!基本機能チュートリアル & GDD 2011 セッション概要」をチェック!
Firebug

Firefoxをメインで使用していたときは随分お世話になったAdd-onのFirebug。これを使えば、上記デベロッパーツールと同様のことがFirefoxでも可能です。Firefox派の方はぜひインストールして使ってみてください!
サクッと実践できるオンラインツール

ブラウザーで簡単にコードのテストができるjsFiddle。コードを入力して「Run」ボタンをクリックするとすぐに結果が表示されます。Webサイトにも埋め込みができるので、ブログなどで解説するときにも便利です。今回はこのjsFiddleを使って解説していきます。「ブラウザ上でHTML / CSS / Javascriptを書いてその場で実行、ブログ等にも貼付できるjsfiddleの基本的な使い方をざっくりと」という記事で詳しく書かれているので、参考になりますよ!
他にもjsdo.itやHTML5 Playgroundなどの同様のサイトがあるので、お気に入りを探して使ってみてください!
1. マウスオーバーでアニメーション画像を表示する

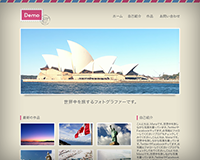
画像にマウスを置くと動画のようなGIFアニメーションが表示されるThe Thomas Oliver Band。動きがあって画面が華やかになりますね!
Step 1: 動画からGifアニメーション画像を作成
静止画像を組み合わせてアニメーションを作成してもいいのですが、今回は例にあげたサイトに近づけるため、動画から作成します。Gifninjaのサイトで簡単に動画からGifアニメーション画像を生成できますよ!

「SELECT FILES」をクリックして動画を選択。動画は3〜4秒程度がよさそうです。次の画面で速度を調節し、タイトルを入力したらボタンをクリック。

生成したら右下の「Download」ボタンでダウンロードできます。これで準備完了です!
Step 2: 画像を重ねる

a タグの背景にマウスオーバーした時に表示するGIFアニメ画像を設定します。さらに a タグ内に静止画像を置くことで、二枚の画像が重なった状態になります。
HTML
<a href="http://webcreatorbox.com">
    <img src="http://webcreatorbox.com/sample/images/drink1.jpg" alt="Iced Drink">
</a>
CSS
a{
    background: url(http://webcreatorbox.com/sample/images/drink2.gif) no-repeat;
    display:block;
}
Step 3: jQueryでマウスオーバー時に静止画像を隠す
さらに jQuery で、マウスオーバーした時に静止画像をフェードアウトさせ、aタグの背景画像として設定したGIFアニメ画像を表示させます。
HTML
<!-- Header内にjQueryを読み込む -->
<script src="https://ajax.googleapis.com/ajax/libs/jquery/1.7.2/jquery.min.js"></script>
jQuery
$(function(){
     $("a img").fadeTo(0,1);
     $("a img").hover(
          function(){ $(this).stop().fadeTo("fast",0);
          },
          function(){
               $(this).stop().fadeTo("fast",1);
          }
     );
});
完成!
GIFアニメは重くなりがちなので、なるべく短めに作成しましょう。例にあげたThe Thomas Oliver Bandのサイトでは、GIFアニメの画像の粗さを逆手にとってグランジ感をきかせてますね。サイトのデザインにあわせて工夫が必要です。
2. 動画を背景に

Beyoncéの公式サイトでは背景に動画が使われています。動きがパッと目にとまりますね!特に新しい技術だったり、小難しいコードを書いているわけではありませんが、迫力のあるサイトが作れるので紹介します。
Step 1: 動画を挿入

まずはHTML。HTML5の video タグを使います。autoplay で自動再生、loop で繰り返し再生します。
HTML
<div class="video-wrap">
  <p>Brilliant Blue</p>
  <video src="images/jewellery.mov" autoplay loop></video>
</div>
Step 2: 動画とコンテンツ部分を重ねる
CSSもいたって簡単。ポイントは position と z-index で動画とPタグを重ねあわせ、レイヤーにして表示することができます。
CSS
.video-wrap {
  position: relative;
}
p {
  font-family: serif;
  color: #fff;
  font-size: 400%;
  position: absolute;
  left: 30%;
  top: 200px;
  z-index: 1;
}
Step 3: 静止画も用意
さらにBeyoncéのサイトでは動画が見れないブラウザ用に静止画も用意しています。ありがたい気遣いですね。video タグ内に img を追加。
HTML
<div class="video-wrap">
  <p>Brilliant Blue</p>
  <video src="images/jewellery.mov" autoplay loop>
    <img src="images/jewellery.jpg" alt="Placeholder">
  </video>
</div>
完成!
See the Pen Video Background by Mana (@manabox) on CodePen.
Beyoncéのサイトのように全画面表示すると迫力も増しますね!動画とコンテンツの配置次第で様々なデザインに応用できそうです。
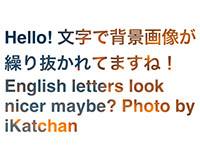
3. 背景画像をテキストできり抜く

Andy Taylor氏のサイトを見てみましょう。スッキリとしたミニマルなデザインですね。一見シンプルなテキストのみのデザインとなっていますが、スクロールしていくと背景に画像が使われていることがわかります。そう、実はテキスト部分も背景画像の一部で、テキスト部分がきり抜かれているのです。

つまりマスクをかけているわけです。
Step 1: 背景に画像を使用
まずはきり抜くところ以外の部分を作っていきます。文字の部分(ここではPタグ)の背景に画像を使います。基本的なHTMLとCSSですね。
HTML
<p>Hello! 文字で背景画像が繰り抜かれてますね! English letters look nicer maybe? Photo by <a href="http://twitter.com/ikatchan">iKatchan</a></p>
CSS
p{
    background: url(http://farm9.staticflickr.com/8152/7676294968_e055f612e0_z.jpg) no-repeat;
    width:556px;
    height:351px;
    color: #fff;
    padding: 30px;
    font-size:300%;
    font-weight:bold;
}
Step 2: CSSで画像をきり抜く
このテキストで画像をきり抜くには background-clip: text; というCSSが使われています。さらにテキストの色も透明にして画像のみを表示させます。
CSS
p{
    background: url(http://farm9.staticflickr.com/8152/7676294968_e055f612e0_z.jpg) no-repeat;
    width:556px;
    height:351px;
    color: #fff;
    padding: 30px;
    font-size:300%;
    font-weight:bold;
    -webkit-background-clip: text;
    -webkit-text-fill-color: transparent;
}
完成!
See the Pen background-clip by Mana (@manabox) on CodePen.
フォントにこだわればさらに美しいデザインになりそうです。グラデーションをかけた文字も簡単に実装できそうですね。ただし、対応ブラウザは今のところChromeとSafariのみなので、他ブラウザーで見ても違和感のないデザインを考える必要がありそう。
「なにこれすごい!」と思うサイトでも、よく見ると簡単なやり方で作られている事もあります(そうじゃない場合もありますが…)。こういった自分なりにサイトを研究したり、実践することは、今や勉強というより趣味となってしまっていますが、その積み重ねが大切なんじゃないかなあと思っています。おすすめサイトがあればぜひ教えてくださいね!